

June 2012
Violin Maker's Wife: Closing Two of Four Instruments
June 30, 2012 12:02Post No. 19
By now it’s time to finalize a meaningful phase in the Quartet construction process – and finally close the “body” of each instrument. As you may remember, at the beginning of the process, Yonatan started with a wooden mold, on which he glued first the ribs and then the back of each instrument. Meanwhile, as I have told you, the sound boards of the cello and the viola have been constructed – including cutting the “f‘s” and reaching the exact “spessori” (thicknesses). But one step remains before the “body” of each instrument is closed. It’s an extremely important and very technical step – fitting in place and shaping the bass-bar (catena in Italian, read ka-tè-na).
What the hell is the bass-bar? Well, bear with me for a minute and imagine a violin…. you know how the strings all “sit” on a wooden bridge? So this bridge has two legs, each of which is supported from underneath (that is to say, from inside the violin – or from underground if you wish). The side of the bridge where the high strings are located is supported by the sound-post (anima), which I’ll get to at a later stage. The second leg of the bridge, where the bass strings are located, is supported – - you got it – - by the bass-bar.
This bar is actually a long, thin, curvy piece of wood that needs to be glued to the inside of the sound-board. Sounds simple? Well, it ain’t necessarily so… the bass bar needs to fit in a most exact manner to the arched underside of the sound board. It also needs to have exactly the right tension, be connected at exactly the right location, at exactly the right angle and about a dozen additional “exactlies” that are related to the properties of the wood, the model you picked, the violin-making school you follow and the-angle-of-sunlight-on-the-longest-day-of-the-year-in-the-equator… no, I guess everything but that last one.
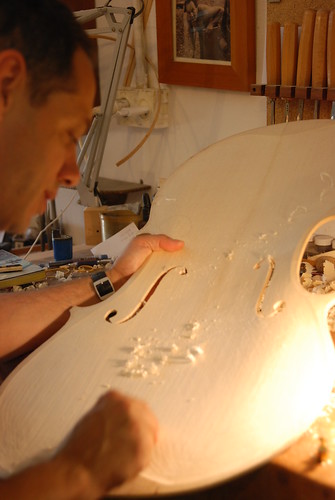
So here is the bass bar of the cello being shaped:
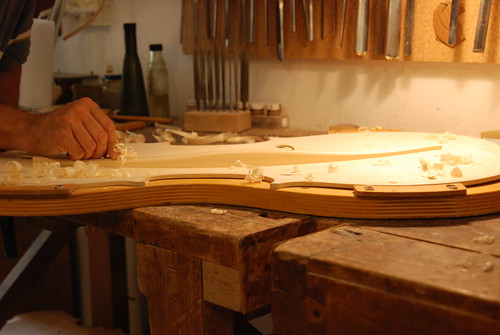

Isn’t this last picture just great? This soon-to-be the interior of the instrument is by now so very smooth that it feels more like silk than wood…
When the bass-bar of the cello was glued into place and finally, patiently, perfectly fitted, Yonatan removed the wooden mold from inside the ribs and back (actually, he told me that he likes to keep the back of an instrument separate from the mold until the sound-board is finished so that he can flex both pieces of wood – one maple, one spruce, remember? – simultaneously, to feel if their thicknesses are perfect together. That someone can actually feel this by flexing pieces of wood is beyond my technologically-challenged imagination…)
Anyway – once the mold was removed and a few additional finishing touches were made (I’ve decided to spare you at least some of the technicalities…) the cello was ready to be closed, looking like this:
As I wrote a few weeks ago, the process of working on the sound-board, cutting the “f‘s”, fitting and gluing the “catena“, gluing the back into place, removing the mold and finally, finally closing the body was all completed first for the cello. This is important for Yonatan, as it allows him to concentrate on finishing the body of one instrument before moving on to the next.
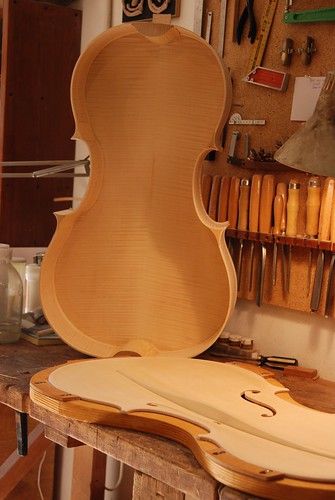
Over the past two weeks Yonatan repeated the entire process with the viola – here is its bass-bar glued into place:
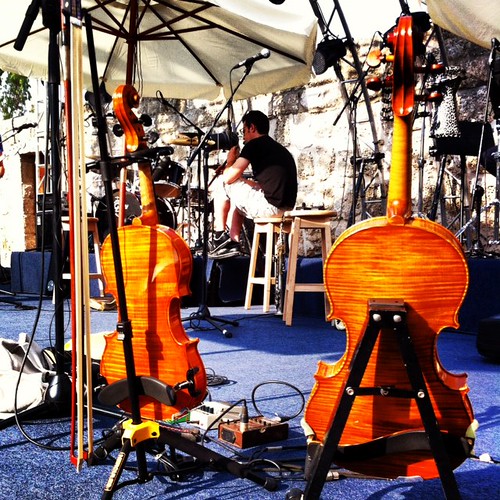
…and here is the entire Quartet, with the viola newly-glued (kinda’ like newlywed…) so still with the special clamps all around it, and the cello already closed and dry behind it.
Pretty cool how they are actually starting to look like instruments, right?
Now I have a question for you – what could be better than going to a concert and seeing Yonatan’s sister play one of his instruments on stage? I thought nothing could surpass that experience… until last night we went again to the same Rita concert where Galia plays a major part on the “Golden Viola” he had made especially for her. Apparently, one of the other musicians that has a major role – he plays a special Persian violin called Kamancheh – couldn’t come to that concert. Galia had to play his part too, and she did this on Yonatan’s violin.
Here’s a picture Galia took of both instruments just before the concert began…
As we summed up what was a truly breathtaking concert: Yonatan had two instruments and a sister on stage!!
Violin Maker's Wife - Cutting the “f’s” Step By Step – A Picture Blog
June 23, 2012 04:51Post no. 18
As I wrote last time, we spent last Saturday at the Open Shabbat in the Artisans’ Compound at Kibbutz Ein Carmel, where Yonatan’s workshop is located. There were not that many people, which was surprising on such a beautiful summer day, but thanks to this Yonatan had some time to actually work. So while the kids kept busy – Itamar building a sword and shield from scrap pieces of wood with a friend of his who came along, Yaara creating “a vase” out of clay that our friend Michael gave her and Alona making as much mess as humanly (or rather “babily”) possible – he started cutting the “f’s” on the viola.
Instead of explaining the process in numerous words, I decided to show you the pictures I took while he worked. I think they tell the story more eloquently than I ever could …
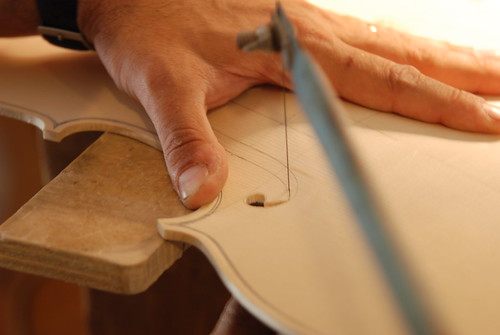
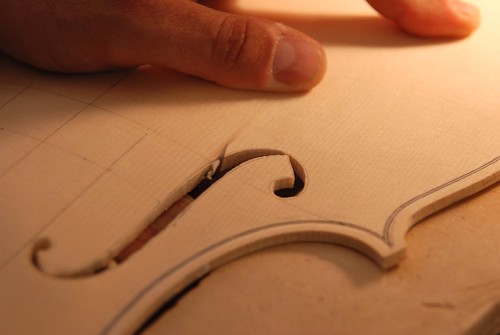
First, he drilled a tiny hole to open the first “f“:

Then, he cut the general shape of the “f‘s” with a special, very thin, hacksaw:

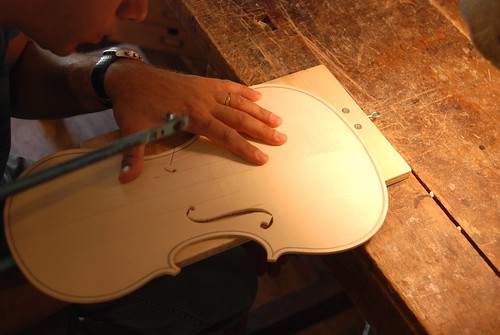
With extreme precision he cut around the edges of the “f“, leaving just a bit of wood on the inside of the line he initially drew:
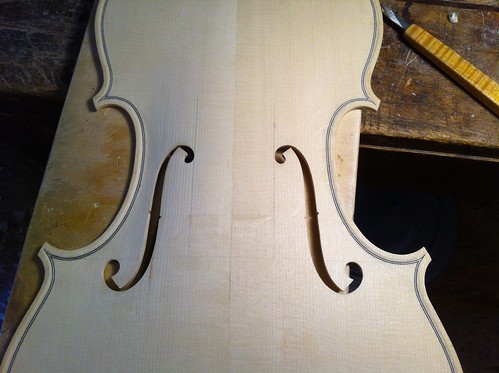
…and then he repeated the entire process in the second “f“:
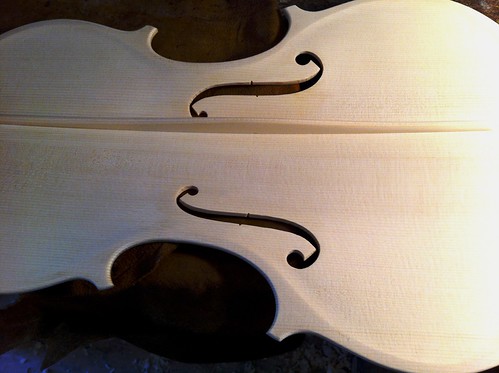
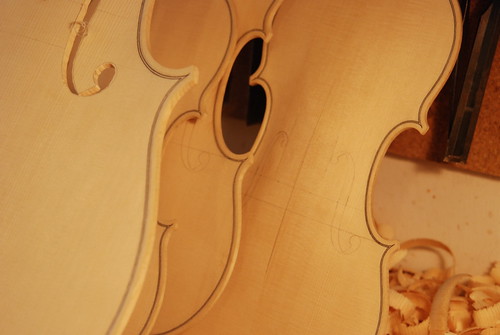
Then began the really challenging part – Yonatan went over the outline of both “f‘s” with a special, razor-sharp knife, until they became perfectly smooth:
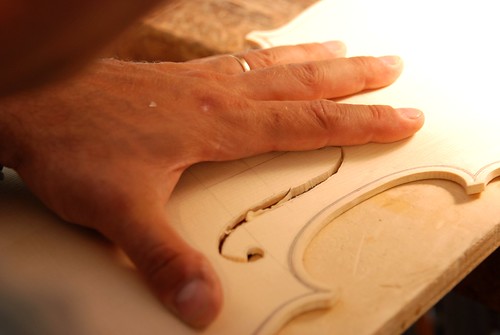
…and that’s it!
One last word of advice – don’t try this at home, it’s not at all as easy as he makes it look ;)
Have a great weekend!
'f' this and 'f' that...
June 16, 2012 11:35No, I haven’t started using “French”… I just want to dedicate this post to the two “f‘s” – or sound-holes – of Yonatan’s Quartet, and I couldn’t resist the title :)
As I wrote last time, the “f‘s” were drawn on the exterior of each instrument’s sound board (or front) before the spessori work began. Once the majority of the wood has been carved out, Yonatan cuts them out (well, right now only those of the cello have been completed, and those of the viola will be in just a couple of days).
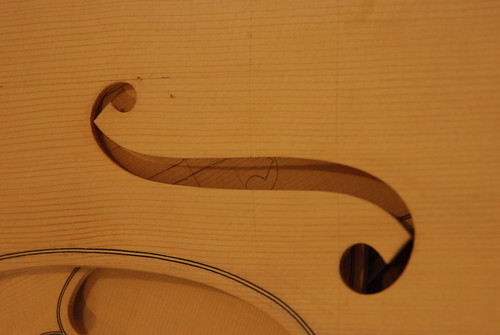
I asked Yonatan to explain the sound-holes to me and he said that, as in many components of the violin family, the sound-holes have both a functional aspect and an esthetic one. Functionally, they are located on both sides of the bridge, in the narrowest section of the sound-board, where the arch is the steepest. This is the area that needs to be flexible enough to vibrate, but at the same time strong enough to carry the tension of the strings. So cutting open the f-holes is what creates the necessary flexibility, allowing the sound-board to vibrate better.
Esthetically, apparently they were not always “f” shaped, but started out actually as two “c‘s”….. By now, though, it’s become tradition that they are “f” shaped, although there are numerous variations on the exact shape – some make them straight, others make them leaning to one side; some make the “heads” of the “f” round (Stradivari-style), and others make them elliptical (Guarneri-style); and so forth.
As was the case with a few prior phases of this work, the sound-holes are a place where the artisanship and personal touch of each violin maker come into play. Apparently, if you know the trade, you can recognize the “signature” of famous violin makers, just by the shape of their “f‘s” (!!) And also, as was the case a few times before, this is a phase that requires special artistic and technical skills (what the Italians call “manualità“, with the accent on the last “a”). Of course that’s why Yoantan likes it….
So in line with his choice to build the Quartet based on his own models, Yonatan designed the sound-holes in a way that would be the same throughout the Quartet, but would also work well with each of the different instruments. As he explained it to me, he likes making the sound holes “a little more oval-shaped than those of Stradivari, but a little less than those of Guarneri”. This is the kind of minute-details I guess I will never be able to see… but whatever makes him happy!
Actually, this is the same way with what is occupying most of our time these days – redoing the new house we recently bought. I look at various details (e.g. a door) and see such things are functionality, color, shape… and that’s about it. Yonatan looks at the same thing and also notices the way the door interfaces with the door-post, the texture of the paint and the interplay between the lines of the wood and those of the window in the next room… I guess in the end it may mean our home will have the same level of perfection as the Quartet ;)
Unfortunately, at the moment the house looks like a real dump. No windows. No doors. No floors. And in part no roof. If I though four more months to finishing the Quartet is a tight schedule, how about 6 WEEKS to turn this construction site into a livable home?!?! Why six? Because in eight weeks the rental on the house we currently live in ends, and the new house had better be ready for us to move in with all our stuff, three kids, a dog and the fish aquarium.
But – as with the Quartet project, we remain optimistic! How about you? Want to place your bets?
So by now it’s Saturday morning and we are on our way to the Open Shabbat at the Artisans’ Compound in Kibbutz Ein Carmel where Yonatan’s studio is located. It promises to be a beautiful summer day with a family picnic, outdoor fun with the kids and probably a couple of friends dropping by to visit, while Yonatan entertains the numerous visitors who come to the compound on these “open weekends”, explaining – once again – how he came to be a violin-maker, what wood a violin is made of, how much time it takes to build one, and how much it costs…
Have a great weekend!
Violin Maker's Wife: What Wood is a Violin Made of?
June 8, 2012 00:18Post. No. 16
Ahh, if I had a dollar for every time someone walked through the door of Yonatan’s workshop and asked this question!! I could happily retire to the Caribbean :)
As I mentioned in one of my previous posts, this is usually the first question people ask about making a violin. The answer is actually rather interesting and I have found that even musicians who play stringed instruments are often unsure exactly which types of wood their instrument is made of.
Well, it’s like this: almost the entire instrument (and this is true for the whole Quartet), is made of a special maple wood, called “flamed” or “tiger” maple, that grows mostly in the Balkans. This is the single trunk that I told you about; the one that Yonatan hand-picked in order to build the entire quartet from; the one that got my romanticism-glands flowing and got me started on this blog. This maple trunk is used to construct the instruments’ backs, ribs and necks and has an especially beautiful grain that looks like flames, or waves, or tiger stripes (wait till we get to the part of the varnish, then you’ll see some really beautiful pictures of this!) Anyway, this is what most of the violin is made of.
The soundboard, or “belly”, of the instrument is a different issue entirely. It’s made of a radial cut (like a fat pizza-slice) from a special spruce tree which, as I briefly mentioned once before, is professionally-selected from the wild forests of the Alps, where the trees have to face harsh weather and compete for scarce sunshine and thus grow just a bit every year. As a result, the “rings” of their trunks are tight and close-together, making the wood lighter (as in less-heavy…) and more resistant. This spruce is then used to construct the soundboard as it has very special flexibility and vibration qualities – it’s basically what makes the violin sing.
Why am I explaining all of this? Well, just to say that last week Yonatan finished the spessori (“thicknesses”) phase of the four backs of his (our?) Quartet, and this week he has been working on carving out the wood from the first soundboard, that of the cello, which is a completely different matter.
First of all, on the external part of each of the four soundboards he drew the two “f” shapes that will make the sound holes on both sides of each instruments’ strings. Then he started working on the cello. According to his method of work – and like everything in the violin-making world, there are a number of traditional methods, each with its centuries’ old logic, ardent followers and no-less-ardent opponents – after the “f‘s” are drown, he craves out most of the wood – but not all. (Yonatan forgot to take a picture of this initial phase, so I’ll make sure he does for the next soundboard…)
When he got to a thickness of 4-5 millimeters (say, about two-tenths of an inch…), he cut-out the “f” holes with a special, brutally-sharp knife. Only then did he finish slowly and painstakingly carving out the last few millimeters of wood. Like in the spessori process he did for the back of the cello, this involved carving out a fraction, testing the thickness by measuring it and by gently flexing the wood…
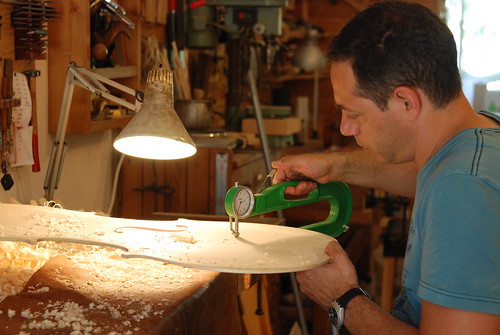
… and repeating this sequence a few dozen times … until the right thicknesses are reached throughout the soundboard.

I stopped by the workshop the other day and saw that he was almost done with the soundboard of the cello (so credit for the last three pictures goes to me this time around:)…) Yonatan explained that he is currently at the point in which the thicknesses of the four backs have been completed and the “f‘s” were drown on all four soundboards. He said that at this point he must leave the “Quartet View” of things for a while and focus on each instrument individually. So now he basically finished carving out the “spessori” and cutting the “f‘s” of the cello and he will continue working on it until the cello’s front and back have been glued to the sides and the body of the instrument (called “cassa“, or ‘box’ in Italian), is closed.
I guess like in any good relationship, sometimes it’s important to distance yourself from the “family”, so that you can develop on your own and come back together in a much better, more complete shape… How is this “violin-analogy-popular-psychology” for you?!?
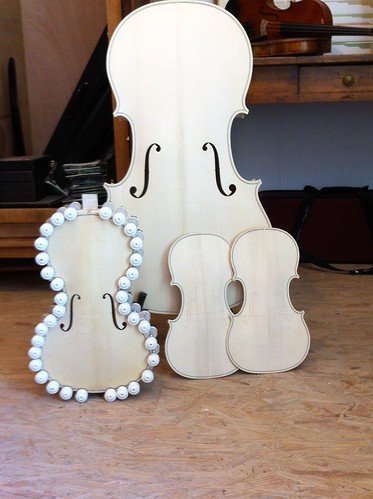
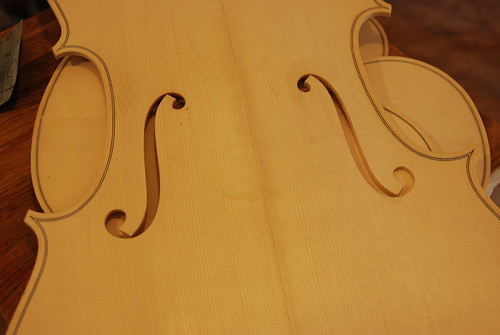
One last picture of the soundboards of all four instruments together, day before yesterday at the workshop:
More entries: May 2012
Violinist.com is made possible by...


Dimitri Musafia, Master Maker of Violin and Viola Cases

International Violin Competition of Indianapolis

Violinist.com Holiday Gift Guide


Johnson String Instrument/Carriage House Violins
Subscribe
Laurie's Books
Discover the best of Violinist.com in these collections of editor Laurie Niles' exclusive interviews.

Violinist.com Interviews Volume 1, with introduction by Hilary Hahn

Violinist.com Interviews Volume 2, with introduction by Rachel Barton Pine