
We have thousands of human-written stories, discussions, interviews and reviews from today through the past 20+ years. Find them here:

How to Play the Violin: The Many Motions in a Single Bow Stroke
A perfect, rapid whole bow stroke is a beautiful coordination of speed, varying hand force from frog to tip, and control of bow angle by using circular motions of the shoulder, arm, and wrist to produce a straight line motion of the bow. The motions are not particularly difficult to perform individually, but to achieve a proper rapid bow stroke, they must be executed as a single intuitive gesture. Instinctive control and artistic tone production will take years of study, but the execution of a proper whole bow stroke can be achieved sooner with a better understanding of each of the component motions and its function.
In this blog I take a deep dive into the whole bow stroke, from frog to tip, including the mechanics of sound production on the violin, an analysis of the individual motions of the right hand and arm, and a discussion of common errors and their correction. The concepts illustrated here have been expressed by fine teachers for many years. However, many players still struggle with bowing and discomfort when playing the violin. By combining an analytical discussion of each separate motion with careful illustrations, I hope to assist in the understanding of how to properly perform the whole bow stroke.
* * *
Physics of the Bow Motion
The sound of the violin is a complex system of vibrations produced by rubbing the hair of the bow across the string. The pressure, speed, rosin used for friction, and distance between the bow and bridge (sound point) are all factors affecting the volume and quality of the sound.
For that reason, the player must carefully control the "sound point" - the position of the bow hair relative to the bridge and fingerboard - throughout the length of the bow stroke. This is achieved by coordinating several component motions of the hand and arm. Any change in the sound point will necessitate corresponding changes in pressure and/or speed and will result in a change of volume and quality of sound.
In order to maintain a constant sound point, the bow hair must generally remain perpendicular to the string (parallel to the bridge). The bow should not drift unintentionally nearer or farther from the bridge.
When the bow is simply pushed or pulled nearer or farther from the bridge, the sideways motion disrupts the proper vibrations of the string and degrades the tone. Instead, control of the sound point during the bow stroke is best achieved by controlling the angle between the bow and the string.
During the down-bow, the bow will slide toward the fingerboard if the tip is angled away from the bridge. The reverse is true during the up-bow. During the bow stroke, control of the sound point consists of making many tiny, very rapid instinctual changes to the bow angle like driving a car very fast down a narrow road.
The hand and the bow must be able to move in a straight line. However, human physiology is not built for this. The bones of the hand and arm are levers which rotate and pivot around the joints. No single, isolated motion will result in a straight line. The bones all move in arcs. Therefore, producing a straight bow stroke in any part of the bow will require both a primary motion, such as the pivot of the forearm around the elbow as part of the down-bow, and a supplemental motion, such as the forward motion of the upper-arm during the latter part of the down-bow to convert the arc into a straight line. Many faulty bow strokes are simply the result of tension that inhibits that supplemental motion or lack of awareness of the pair of motions that must work in tandem to produce the desired straight line motion.
Friction - between bow hair and violin string - is the force that creates sound. There are two types of friction: static and dynamic. Static friction refers to the force needed to start an object sliding over a surface. Dynamic friction refers to the force required to keep that object in motion. When there is a relatively large difference between static and dynamic friction, we say that the object or surface is "sticky." Rosin applied to the bow hair makes the hair "sticky" in relation to the string. Surprisingly, an un-rosined bow makes no sound at all when drawn over the violin strings.
The Vibrating String
When the bow hair is drawn across the string at any consistent sound point, the string will begin to vibrate in a complex but systematic pattern producing the pleasing "violin sound." The bow produces the desired sound as a result of friction between the rosined hair and the string, which instigates the vibrating of that string. The contact must be sufficient to pull the string sideways (by static friction) creating a little "kink" in the string which then snaps free and moves rapidly to the nut (toward the scroll) or the finger holding down the string. It then bounces back to the bridge relatively unimpeded by dynamic friction between the bow and the string.
If contact is too light, the little kink is not produced and a light whistling or hissing sound is heard. If contact is too heavy, the little kink cannot move unimpeded and a croaking sound is produced. The desired complex motion of the string is called "Helmholtz motion," and it is different for a bowed string than for a plucked one.
Bow pressure alone does not make or increase sound. More pressure may be required to play more loudly at a given sound point, but more pressure does not by itself create more volume. Pressure increases friction which allows the string to be pulled farther before the little kink snaps free. Volume is increased by increasing the amplitude of the displacement of the string, i.e. how far to the side the string is pulled before snapping free. Playing louder is accomplished by moving the bow faster while simultaneously moving the sound point closer to the bridge and correspondingly increasing pressure. Perceived volume is also influenced by controlling the quality of the sound and the harmonics produced by the vibrating string and the violin itself. (See Simon Fischer’s wonderful works on tone production.)
When talking about bowing, it is important to very clearly understand two things about the terms we use. First, we must understand the "true" or technically correct meaning of the word we are using. Second, we must understand how a particular student interprets and integrates the concept being conveyed into their playing. Sometimes the technically correct use of a word in the particular context of violin playing will carry a negative connotation. We certainly do press our fingers on the violin strings and we certainly do press our bows against the strings. An accurate definition of pressure is the exertion of force upon a surface by an object. More technically, pressure is defined as perpendicularly applied force per unit area. However, for the violinist, the terms "press" and "pressure" often imply squeezing, or twisting to increase torque and the use of muscle contractions to accomplish an action which is, in reality, better achieved by relaxation and the use of gravity.
The term "force" also carries a negative connotation, but it is perhaps the most accurate term to describe increasing the pressure of the bow against the string. When the more or less perpendicular force of the bow against the string is increased, pressure increases since the contact area doesn’t change and the coefficient of static friction increases (more sticky) allowing the bow to exert more of a horizontal force before the string slips free and moves sideways relatively unimpeded by dynamic friction.
So for the purposes of this explanation: rather than saying "perpendicularly applied force," or the inaccurate term "weight," I prefer to use the accurate and specific term "pressure."
Motions of the Arm
Let’s look at some simple motions of the arm and hand. For the sake of simplicity, sometimes the thumb will be considered a finger, the fingers part of the hand, the hand and wrist part of the arm, and the forearm and upper arm included in the general term "arm". The exact meaning of the terms should be obvious from the context of the discussion.
(1) The forearm moves closer to the upper body as the elbow joint closes during the up bow, and the forearm moves farther from the upper body as the joint at the elbow opens during the down bow. This movement of the forearm rotating around the elbow joint is the simplest and most basic bow stroke.
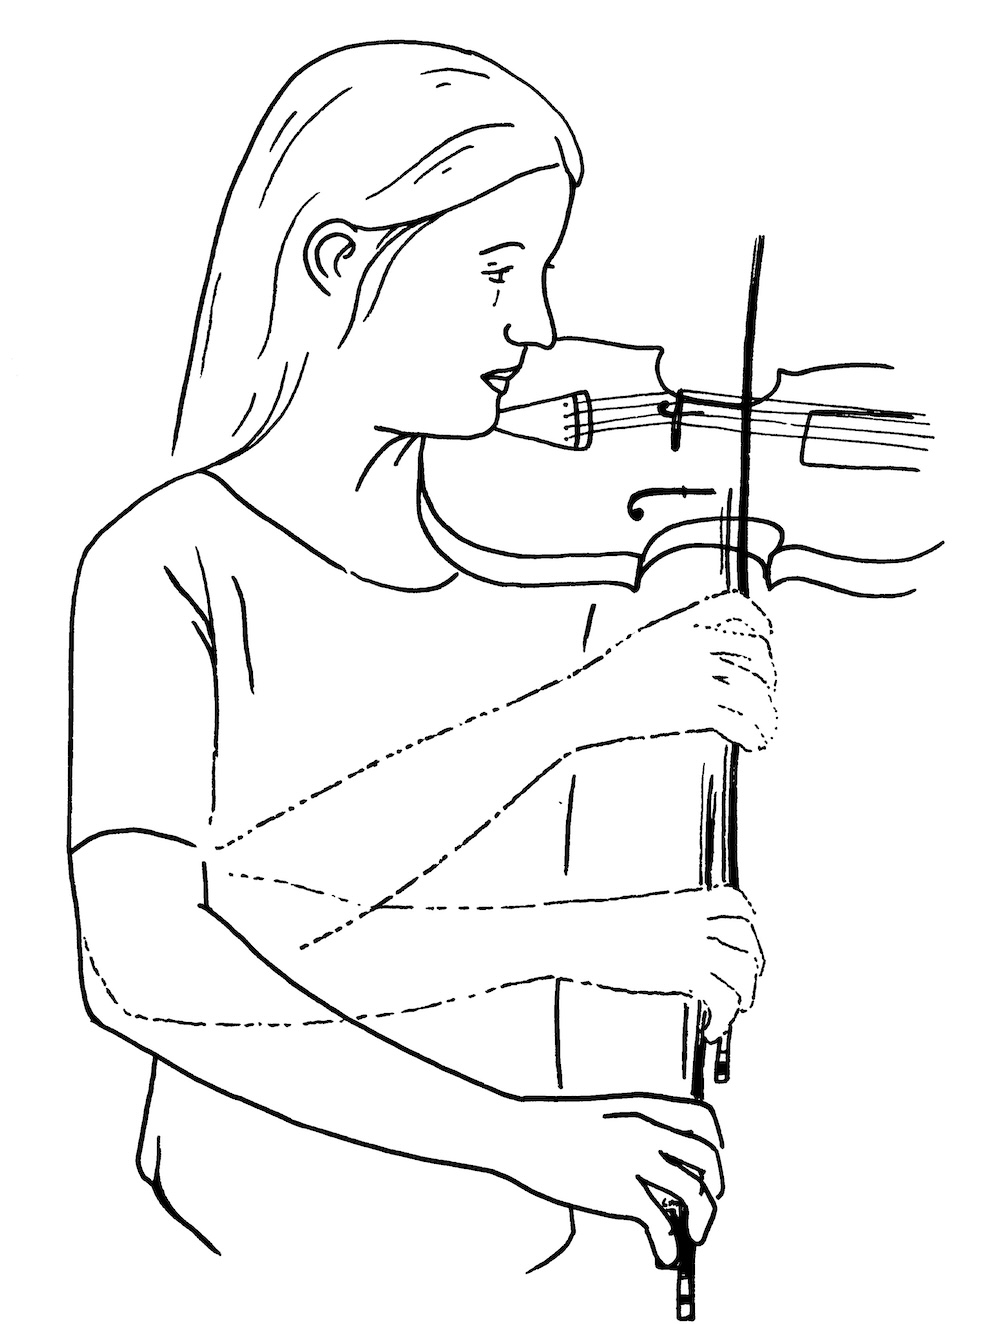
Illustration by Lioba Menger.
(2) The upper arm swings forward and back at the shoulder like reaching forward to grasp something with your hand and then pulling it back.
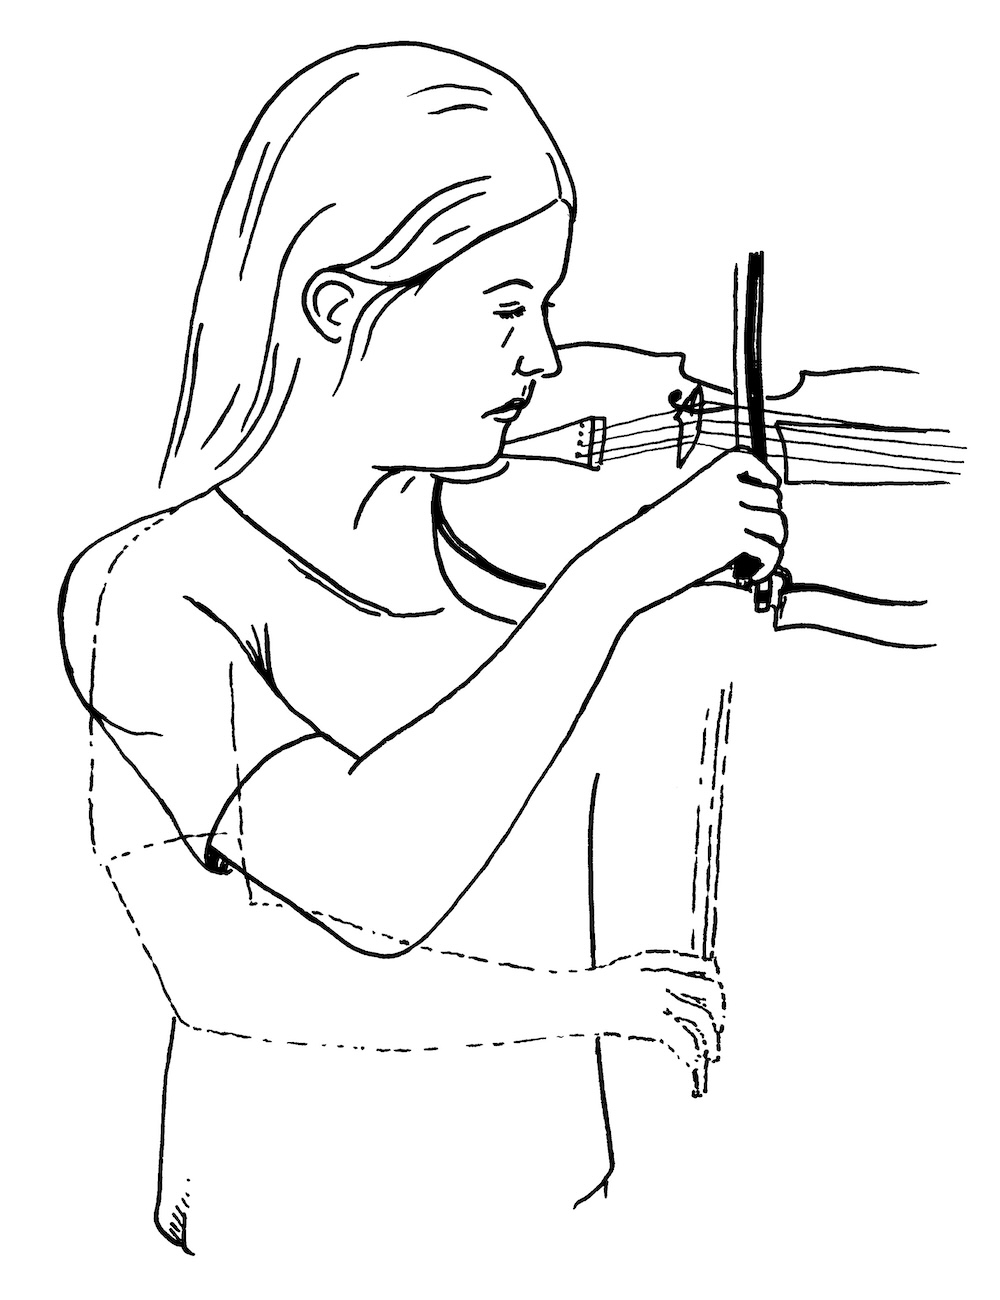
Illustration by Lioba Menger.
(3) The upper arm pivots up and down from the shoulder like flapping a wing. Be careful to avoid a "shrugging" motion that lifts the shoulder. Likewise, the upper arm may rotate within the shoulder joint, carrying the forearm with it, leading to the terms "high or low elbow", or "high or low arm". Thus a "high" or "low" elbow or arm may result from lifting or lowering the upper arm at the shoulder (flapping motion) or it may be the result from rotating the upper arm in the shoulder producing a different relationship between upper arm and forearm without any actual change in elbow height at all.
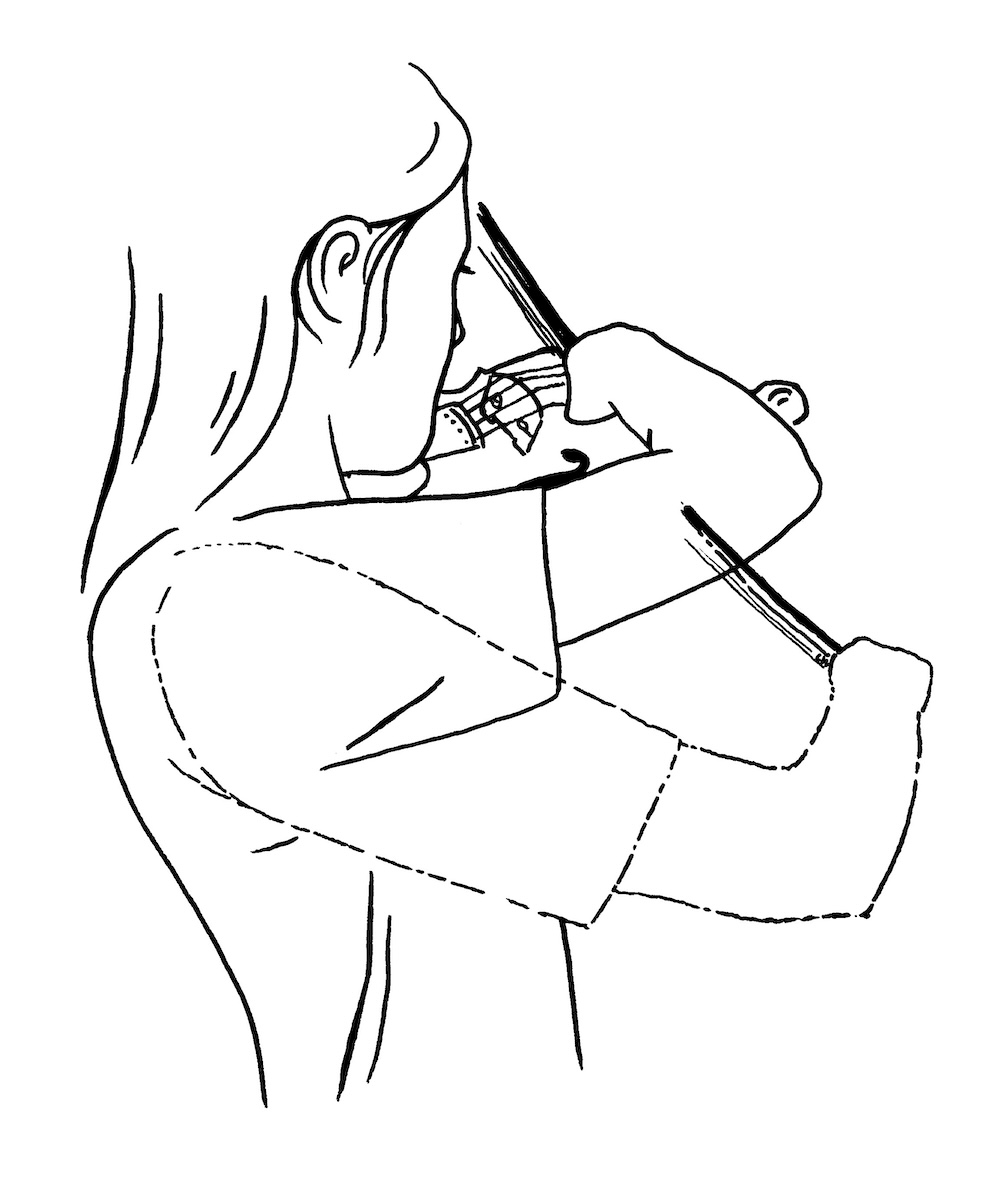
Illustration by Lioba Menger.
(4) The forearm rotates like turning a doorknob counterclockwise during the down bow (pronation) and turning clockwise (supination) during the up bow. Hindrance of this essential rotation leads to, among other things, the dreaded "straight pinky".
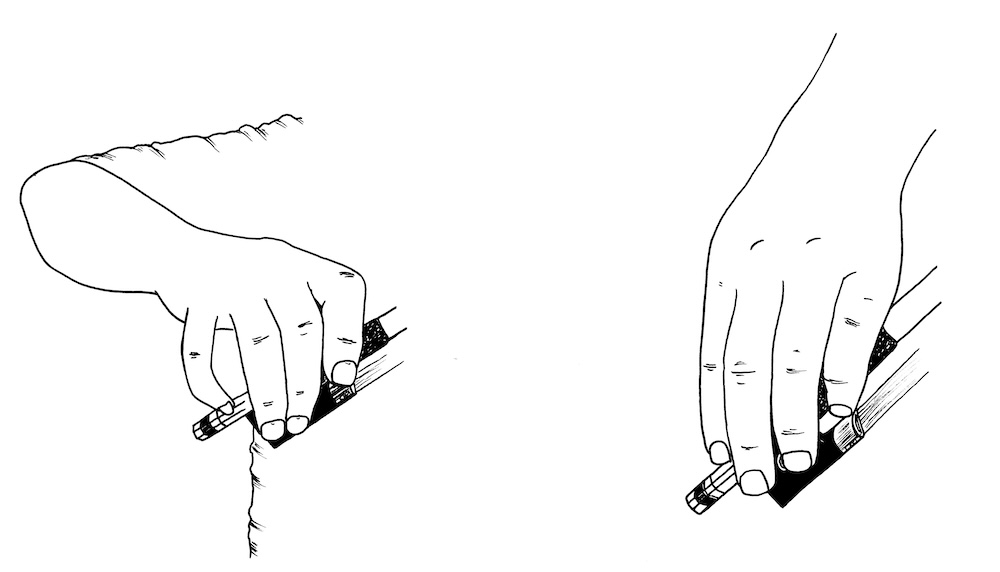
Illustration by Lioba Menger.
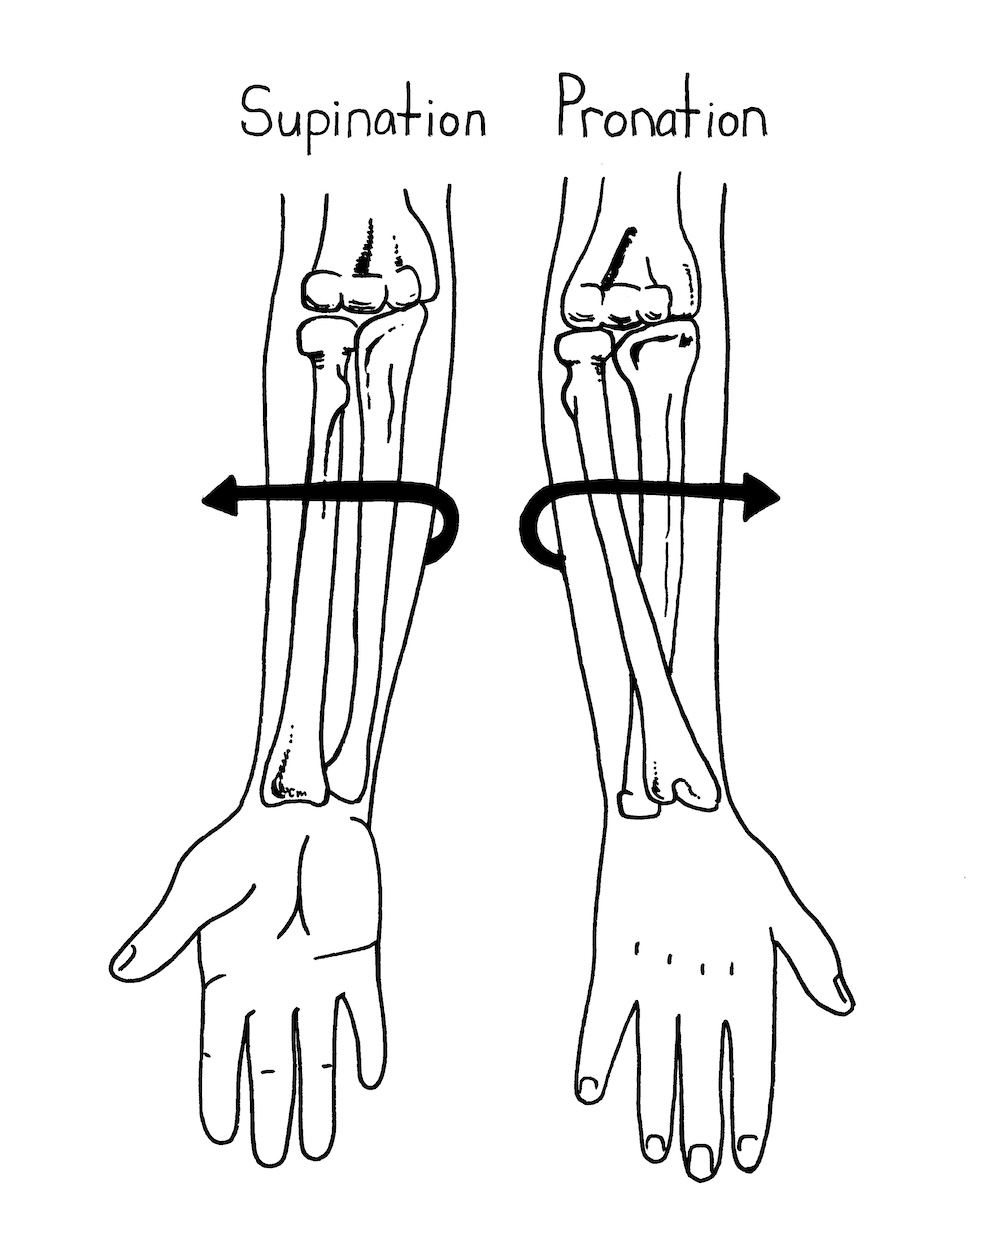
Illustration by Lioba Menger.
(5) The hand moves up and down from the wrist (like a waving motion) resulting in the somewhat confusing terms "low" or "high" wrist. What is implied is a reference to the angle between the forearm and the hand.
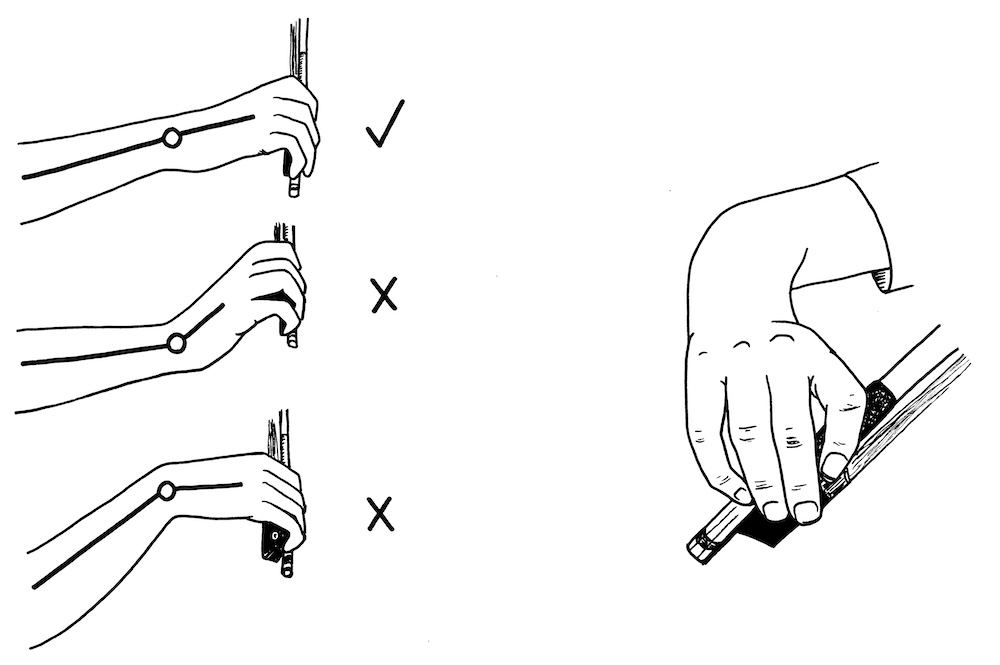
Illustration by Lioba Menger.
The Hand
The plane of the hand varies with forearm rotation. Playing at the tip of the bow, the fingers are more or less straight with the thumb extended. At the frog, the fingers and thumb must be curved and quite bent to accommodate the rotation of the hand back towards the little finger. At the frog, the hand, including the first two fingers to the middle joints, and the forearm should form a fairly straight line, with the hand, wrist, forearm, elbow and upper arm in roughly the same plane. In other words, no high knuckles, no high (or low) wrist and no low elbow.
At the beginning of a down-bow, at the frog, the hand should be rotated with the forearm slightly back toward the little finger (think of barely lifting the first finger). At the middle of the bow the plane of the hand should be parallel to the stick. At the tip the hand should be rotated along with the forearm more or less toward the first finger. The amount of rotation at the tip depends upon arm length and the angle of the violin with the body.
At the tip, the bow rests with flat hair upon the string. As the bow progresses through the up-bow, the stick should gradually tilt toward the fingerboard. This will result in a relaxed hand and wrist, soften the feel of the hair on the string at the frog, and control wanted (or unwanted) bounce.
The bow is a lever resting on the string and pivoting around the thumb, which acts as the fulcrum. At the frog these two contact points (thumb and string) are almost touching. The thumb serves two purposes: first to simply hold up the bow against gravity and second to serve as a fulcrum as described above. At the tip, the two points have moved apart the full distance of the bow stroke. The bow pivots around the thumb in order to increase or decrease pressure between bow and string and to accommodate bouncing strokes. At the frog, the weight of the bow is balanced primarily by the little finger, in the middle of the bow the bow is balanced on the string, and at the tip pressure is primarily transmitted by the first finger. There is a smooth transfer of pressures from the fingers behind the thumb at the frog to pressures from finger(s) in front of the thumb at the tip.
A common cause of tension in the hand is failing to relax the thumb counter-pressure during each up bow. This results in a tense, inflexible hand at the frog.
Energy is transmitted to the bow through the fingers and thumb. Teachers often focus on the arm, which is appropriate, but it is under-appreciated that the only contact the player has with the bow is at the tips of the thumb and little finger, and below the middle joints of the remaining three fingers. The fingers have to transmit all of the energy required to press the bow against the string, pull the bow forcefully enough to make the desired sound, bounce the bow and control the position of the sound point. It is absolutely essential that the fingers are curved and relaxed and that they remain in contact with the bow.
Bow Hold
The function of the hand and fingers is to connect the arm to the bow, transmit energy to the bow, and to control the orientation of the bow to both the hand and the string.
The thumb, acting as a fulcrum and supporting the bow against gravity, must, obviously, be placed under the bow. In order for it to be strong and flexible, it must be curved and relaxed.
The fingers, transmitting energy to the bow, must remain in contact with the bow in order to function efficiently. As with the thumb, the fingers must be curved, relaxed, and flexible. In order to better control the orientation of the bow, and to transmit energy, the fingers should curve over the stick with the middle and ring finger in contact with the side of the frog. More surface area in contact allows less pressure and less tension. The fingers should not contact the stick above the middle knuckle of the first finger or flexibility will be lost. The fingers should not hold the bow by their tips or pressure will increase and the strength and stability of the bow hold will decrease.
The pressures of the first finger and little finger must be variable and flexible. The balance of the hand must be such that the bow is free to pivot around the thumb or it will be impossible to properly execute bouncing, springing bow strokes.
Posture
Proper posture is uncontroversial, easily understood, and all-too-often ignored. In order to support the violin and the arms, held in somewhat of an unnatural position, the body must be relaxed and balanced. In particular, avoid lifting either shoulder (shrugging) to assist holding the violin or as part of a dysfunctional bow stroke. A relaxed and effective bow stroke depends upon a relaxed and balanced body, which depends upon proper posture A tense shoulder can inhibit almost any motion of the bow stroke. Do not overlook proper posture when analyzing the bow stroke.
Analysis of the Basic Whole Bow Stroke
Now that we have looked at the individual components of the bow stroke, let’s examine how they function together to create the entire motion from start to finish.
We will start with the bow on the string at the frog, the bow placed carefully parallel to the bridge, with the fingers and thumb nicely curved.
Several of the following points are nicely addressed in Principles of Violin Playing and Teaching by Ivan Galamian. For the sake of clarity, the motions are numbered sequentially but may occur more or less simultaneously and continuously during the whole bow stroke.
Motion one: Open and close. During the down-bow the angle at the elbow begins to open and continues to open until the arm is almost fully extended as the bow reaches the tip. Function: To produce the bow stroke by pushing and pulling the bow across the string.
Motion two: In and out. The upper arm begins to move back, away from the bow, until the midpoint of the stroke, where the upper arm and forearm make a 90 degree angle. From this point onward in the down-bow, the upper arm reverses direction and moves forward toward the bow. Note that the motion is accomplished by opening the elbow and also, very importantly, the motion of the upper arm at the shoulder. Function: To counter the arc that would normally pull the bow out of perpendicular alignment with the string.
Motion three: Up and down. During the down-bow the upper arm at the elbow immediately begins to descend and continues its descent throughout the stroke. At the tip of the bow the entire arm begins to rise and during the up-bow continues to rise until the frog is reached. An effective analogy is to imagine standing in a large tank of water. As the water rises your hand and arm float on the surface. Function: To maintain consistent orientation of the forearm and wrist with the plane of the bow.
Motion four: Rotate. The forearm, beginning again at the frog, begins a rather subtle counterclockwise rotation like turning a doorknob. Then, from the tip back to the frog on the up-bow, the motion is clockwise. The lack of rotation, along with lack of flexibility in the fingers, is the cause of a high wrist with a straight little finger at the frog. It doesn’t help to admonish the student to "bend your pinky" when the root cause of the improper hand position is inadequate rotation of the forearm during the up-bow. It is also crucial that all of the fingers cooperate in this motion by extending during the downbow to the tip and curving during the up-bow to the frog. Practice this finger motion without the bow; exaggerate it by making a fist near the strings and smoothly extending the hand and fingers to be completely straight at the pretend tip of the bow. Function: To maintain proper orientation of the plane of the hand with the bow.
Motion five: Tilt bow. Generally, the bow at the frog is resting slightly on the outside edge of the hair, that is, the edge of the hair that is away from the bridge. During the down-bow, as the upper arm descends and the wrist flattens slightly, the bow stick moves back over the hair. At the tip the hair is flat on the string. During the up-bow the bow rotates so that the stick tips away from the bridge and the bow rests again on the outside edge of the hair. Note that this is a generalization and that control of the tipping of the bow stick is complex and in many ways influences both sound and the dynamics of more advanced bow strokes. Function: For the purposes of this discussion, to maintain a proper relaxed hand and wrist alignment.
Note that the motion of the down bow (opening of the elbow joint) is a completely separate movement from the motion of crossing from a lower string to a higher string (motion of hand and/or forearm and flapping motion from the shoulder). The feeling of producing the up bow is remarkably similar to raising the arm to cross from a higher string to a lower one. The motions may occur more or less simultaneously but should always be examined and practiced separately; In particular, isolate and practice the motions of leading with the elbow to move from a higher pitched string to a lower one, and leading with the wrist in moving from a lower string to a higher one.
Common Problems, Likely Causes, and Their Solutions
The bow sliding over the fingerboard during the last half of the down-bow - this is the most common bowing fault I observe. It destroys a strong, consistent tone and positions the bow for even more trouble on the up-bow. By far the most common cause is the lack of forward motion of the upper arm moving at the shoulder joint to counteract the arc of the forearm swinging back from the elbow. This often results from inattention; if the student is reminded, it is easily temporarily corrected. It is often also caused by tension and the resulting lack of mobility in the shoulder joint. Stress, fatigue, and stage fright all contribute to a tight shoulder and loss of control of the sound point. Interestingly, it also occurs sometimes as a result of improper understanding and execution of string crossings. It is important to determine what is going wrong: the string crossing or the bow stroke itself.
The bow sliding towards the bridge, or less commonly over the fingerboard, in the first half of the down-bow results most often from improper use of the fingers to align the bow parallel to the bridge from the very start of the down-bow.
Trembling and shaking of the bow during the down bow results from a complicated interplay between arm speed and bow speed, and transfer of weight from arm to bow. Surprisingly, it can often be entirely eliminated by ensuring that the elbow continues to rise during the entire up-bow, especially during the last third of the up-bow. Keeping the elbow high at the frog, positions the arm for a continuous, smooth descent during the down-bow. It is also helpful to tilt the bow a little more than usual to dampen the natural tendency of the bow to bounce. The "bow-shakes" is a complicated and common problem often related to nerves and tension, and the properties of the individual bow itself. A full discussion is beyond the scope of this article, but it is still surprising to me how often simply ensuring a continuously rising elbow during the latter part of the up-bow will fix it.
Croaking, whistling, or squeaking sounds occur when the sound point shifts without the appropriate adjustment in bow speed and pressure. Determine what is causing the bow to drift. Quite often students will ask what is causing that squeaky sound without even being aware that their sound point is drifting by as much as an inch or so.
Reluctance and/or inability to use the whole bow often results from an inability to properly use the fingers at the frog and to properly extend the arm at the tip.
As the speed of the bow stroke increases, the proper alignment of bow and string becomes more critical. Also, the speed with which corrections can be made is a limiting factor. This is like driving down a narrow road at increasing speed. Students often resist practicing and using the whole bow because they fear "driving into the ditch." Slow, very precise practice of the whole bow stroke from the frog to the absolute tip, while gradually speeding up and experimenting with varying sound points, will increase the comfort and confidence with which the whole bow is used.
High wrist and/or straight pinky at the frog may be simple problems caused by a lack of forearm rotation. However, they may result from a lack of understanding and integration of the hand and finger motions if the rest of the basic bow stroke is correct. Often, strange finger or hand positions are an attempt to compensate for an error in the basic arm motions.
Inability to perform more advanced strokes results more often from deficiencies in fundamental technique than from difficulty in the advanced technique itself. Collé, the quick string-catching, lifting stroke, is certainly a problem if finger control or hand position is inadequate. As is well known, collé is a useful exercise to improve finger and hand control.
Bouncing strokes such as spiccato and saltando depend upon a stable alignment of hand and fingers as the bow rapidly crosses strings. If the hand and fingers are being used inappropriately for string crossing, the bow stroke itself becomes infinitely more complex because each bounce on each string requires a different set of fundamental motions. Lack of suppleness and lightness of either thumb or little finger may partially inhibit the rotation of the bow around the thumb fulcrum and completely inhibit the desired bounce.
Simple and Unusual Practice
It is very useful to isolate each of the movements of the arm and hand, and to practice each specific motion in an exaggerated way without holding the bow. As we have seen, each motion is easy to perform on its own. Coordinating all of the motions is challenging, but the most common fault I have observed is the complete absence of one or more of the crucial movements either through lack of awareness or inhibition due to tension.
I have the student explain to me, from memory and without holding the bow, each of the five component motions of the hand and arm. The student must properly demonstrate and exaggerate each motion while explaining its function. This is repeated while holding the bow and as each successive motion is added in a coordinated fashion. It is also beneficial to have the student occasionally carefully perform exaggerated, incorrect movements to increase awareness and recognition.
Improving the bow stroke is a never-ending process. There is really no such thing as a perfect bow stroke, only a functional one. However, many players, even at fairly high skill levels, execute bow strokes almost completely lacking in one or more of the component motions. With careful study of each separate motion and diligent observation it is actually quite easy to quickly improve most faulty bow strokes.
Further reading: Simon Fischer's books, Practice and Basics, and Ivan Galamian's Principles of Violin Playing & Teaching.
You might also like:
- How to Hold a Violin, by Michael Schallock
- Violinist.com interview with Simon Fischer: Basics and Practice
- Fundamental Violin Techniques: How to Hold the Bow
* * *
Enjoying Violinist.com? Click here to sign up for our free, bi-weekly email newsletter. And if you've already signed up, please invite your friends! Thank you.
Replies

I liked the clarity of Michael's well-focused writing. Lioba Menger's drawings are an additional help.
There are a few treasures on the YT with a set of old videos of Robert Rozek, a pupil of Nathan Milstein, demonstrating the bowing approach in detail. One of them is here:
https://www.youtube.com/watch?v=IXFIxArQBjQ

Beautiful article, Mr. Shallock. I was extremely intrigued throughout!
This article has been archived and is no longer accepting comments.


June 5, 2025 at 10:31 AM · Thank you, Michael, I find such systematic descriptions extremely helpful for students (regardless of the age of the students). Of course a systematic description means that one must break down an extremely complex process to the most important principles, but I found your descriptions very good and learned some things that I didn't read in the same way in Fischer's “Violin Lesson”, for example.